Table of Contents
What is AutoSSL?
Auto SSL is a feature available in WHM on our VPS and Dedicated server plans. It installs free SSL certificates for specific websites that are hosted in the correspondent WHM.
With User-responsible and Basic hosting plans, you can enable AutoSSL for your websites through WHM.
If you’re using a Complete hosting plan or you don’t want to go through the hassle of enabling AutoSSL yourself, you can submit a ticket to the “Hosting – VPS and Dedicated Servers” department here and our team can assist you with the process.
Note: if you have any issues with enabling AutoSSL on a User-responsible hosting plan, an extra fee is required for our support team to check the issue.
How to enable Auto SSL in WHM
To enable the AutoSSL feature for specific websites, follow the steps below:
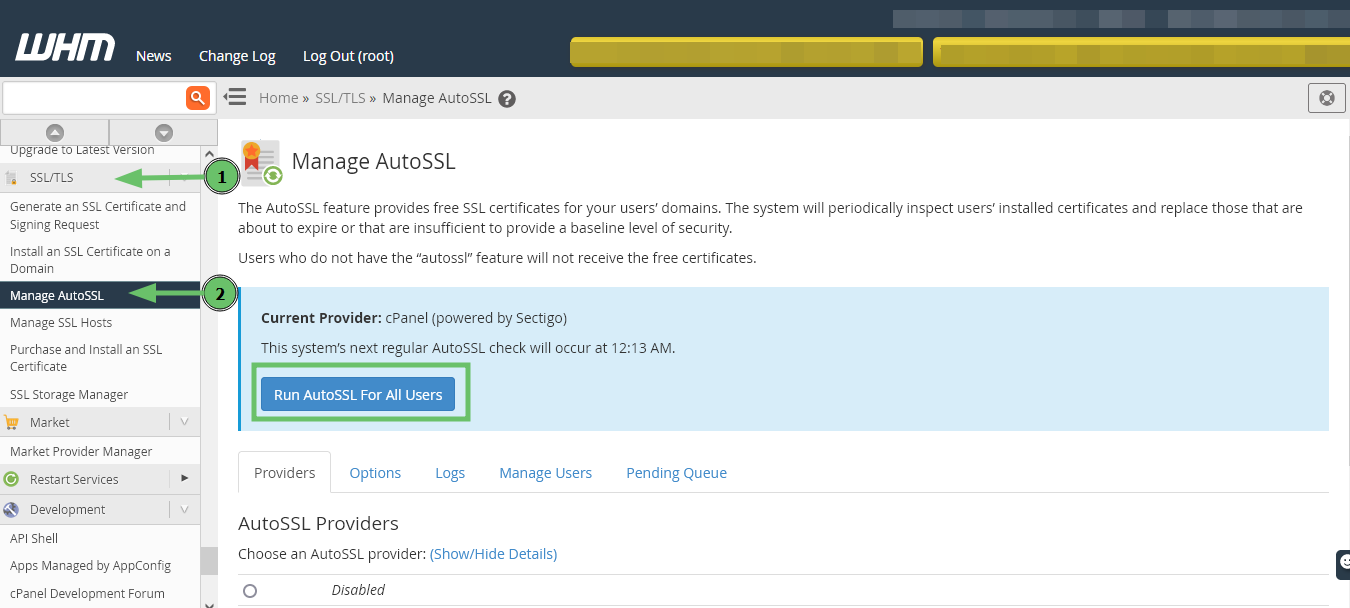
- Go to the WHM panel, open the “SSL/TLS” section and click “Manage AutoSSL”.
- Click the “Run AutoSSL For All Users” button to enable the SSL certificates for all the domains and subdomains in this WHM panel and its cPanel accounts.

OR
- To enable or disable AutoSSL for a specific user, go to the “Manage Users” tab.
- Choose the corresponding option:
- “Enable AutoSSL” – to enable AutoSSL for a specific user;
- “Disable AutoSSL” – to disable AutoSSL for a specific user;
- “Reset to Feature List Setting” – to enable the default AutoSSL settings that were specified during the Feature list creation.

You can also enable AutoSSL for several specific users. To choose the exact users, just tick their names in the list. Then, you can use the buttons above the user list to enable, disable or reset to the default settings.

If there are issues with the AutoSSL setup, you can check the issue on the “Logs” tab by choosing the specific log and clicking “view log”.

How to manage Auto SSL certificate in cPanel
If the “Allow AutoSSL to replace invalid or expiring non-AutoSSL certificates” option is enabled in WHM, the SSL certificate will be installed in cPanel automatically.
If this option is disabled, the added SSL certificate should be installed manually by following the simple steps below:
- Go to the “SSL/TLS Status” section in cPanel.

There you will see a list of all the domains and subdomains in cPanel along with their SSL certificates.
- If an SSL certificate was not installed for any of the required domains, you can select the domains in the list and click “Run AutoSSL” to force AutoSSL installation for them.

OR
- Another option to enable a certificate is to install it manually via the “SSL/TLS” section:
Go to the “SSL/TLS” section in the cPanel account and choose “Certificates (CRT)”. There you will see a list of the SSL certificates that were added to cPanel.


Choose the required certificate and click “Install”. After this, you will be taken to the certificate installation page.

Scroll down and click “Install certificate” to proceed with its installation.
To check the installed SSL certificates in cPanel:
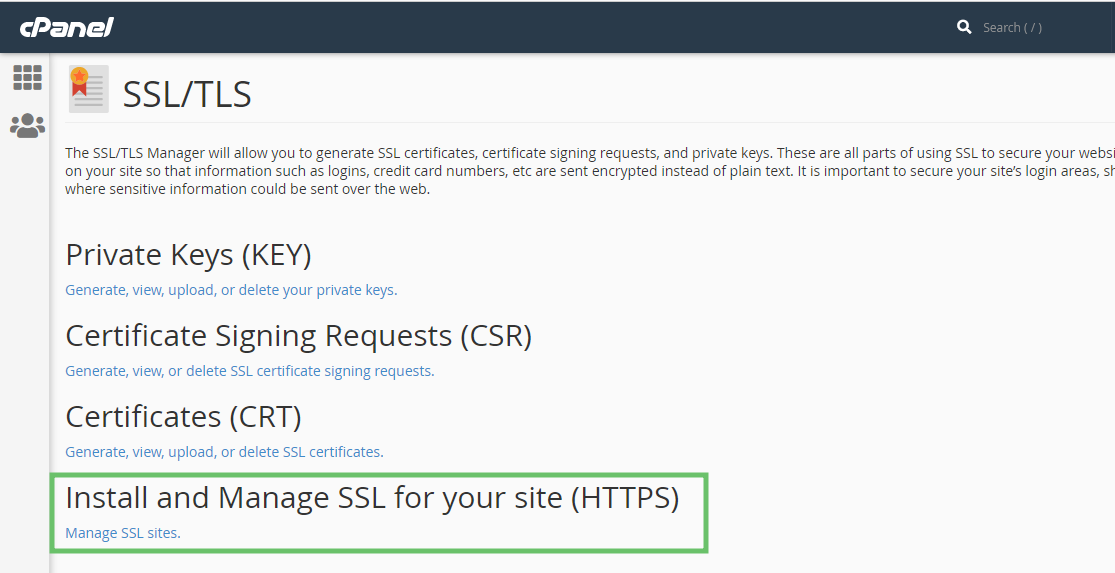
- Go to the “SSL/TLS” section in cPanel;
- Click “Install and Manage SSL for your site (HTTPS)”;

- Wait a few seconds to see the list of the domains and subdomains added to cPanel;
- If a green lock symbol appears next to the domain or subdomain, this means the SSL certificate has been installed correctly. You can check more information regarding the SSL by clicking on “Certificate Details”. The certificate issuer, domains and subdomains included in this certificate will be listed there.

Use the “Uninstall” option to remove the certificate. This will disable the certificate, but it will still be stored in cPanel.
If you ever need to enable the SSL again, you can install it via the “Certificates (CRT)” part in the “SSL/TLS” section by clicking the “Install” button beside the required certificate.
You can also check if the certificate is installed correctly by using this tool. Simply enter the domain or subdomain into the correspondent field and click “Check”.


