Applications with Webuzo – One of the standout features of the Webuzo control panel is its powerful one-click App Installer, which makes it easy to deploy, manage, and update popular applications and software on your server. Whether you’re setting up a blog, e-commerce store, or content management system (CMS), Webuzo simplifies the entire process. In this post, we’ll explore how to install and manage applications with Webuzo’s App Installer, helping you get your website or application up and running in no time.
Table of Contents
Why Use Webuzo’s App Installer?
Webuzo’s App Installer offers numerous benefits, including:
- Speed and Simplicity: Install applications in seconds without any technical expertise.
- A Wide Range of Applications: Access over 400 popular applications, including WordPress, Joomla, Magento, and Drupal.
- Easy Management and Updates: Manage installations, configurations, and updates all from one control panel.
- Reduced Server Complexity: The App Installer handles dependencies, making installations smoother and reducing errors.
With these advantages, Webuzo’s App Installer is an excellent tool for beginners and seasoned developers alike.
Steps to Installing and Managing Applications with Webuzo’s App Installer
Step 1: Log in to Your Webuzo Control Panel
Start by logging into your Webuzo control panel. Ensure you have the necessary permissions to install applications, as some features might be restricted to administrators.

Step 2: Explore the Webuzo App Installer Library
Once logged in, navigate to the App Installer section:
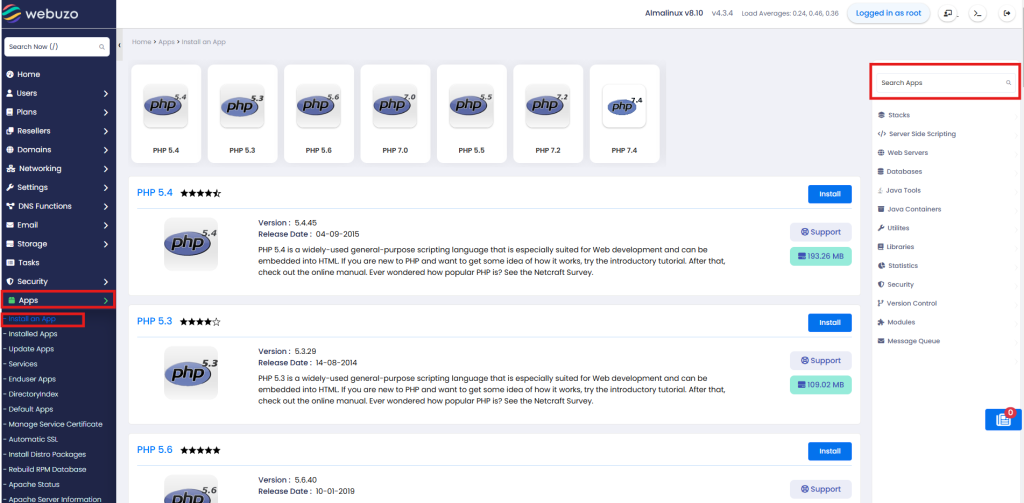
- In the Webuzo dashboard, go to Apps > App Installer.
- You’ll see a categorized list of available applications, including Blogs, E-Commerce, Forums, Image Galleries, and CMS options.
- Use the search bar or category filters to find the specific application you want to install.
This extensive library allows you to choose from various applications, ensuring you can find the right tools for your project, whether it’s a blog, online store, or community forum.

Step 3: Install an Application
To install an application using Webuzo’s one-click App Installer, follow these steps:
- Select the application you want to install (e.g., WordPress).
- Click Install to start the installation process.
- Fill out the installation details:
- Choose Protocol: Select HTTP or HTTPS, depending on your SSL settings.
- Domain: Choose the domain or subdomain where you want the application to be installed.
- Directory (optional): If you want the application installed in a subfolder, specify the directory here (e.g.,
/blog). - Admin Account Details: Set up the administrator username, password, and email for managing the application.
- Click Install to start the installation. Webuzo will automatically download and configure the application.
Within seconds, your chosen application will be installed and accessible on your specified domain or subdomain.
Step 4: Access and Configure Your Application
After the installation is complete, you’ll see a success message along with links to access your new application. You can now log into your application’s admin area (for example, WordPress Admin Dashboard) using the credentials you created during installation.
From here, configure your application’s settings, customize the appearance, and start adding content. Webuzo makes it easy to manage and launch your application without needing to dive into complex configurations.
Step 5: Managing Installed Applications
The Webuzo App Installer not only handles installations but also simplifies the management of installed applications. Here’s how to access and manage your applications:
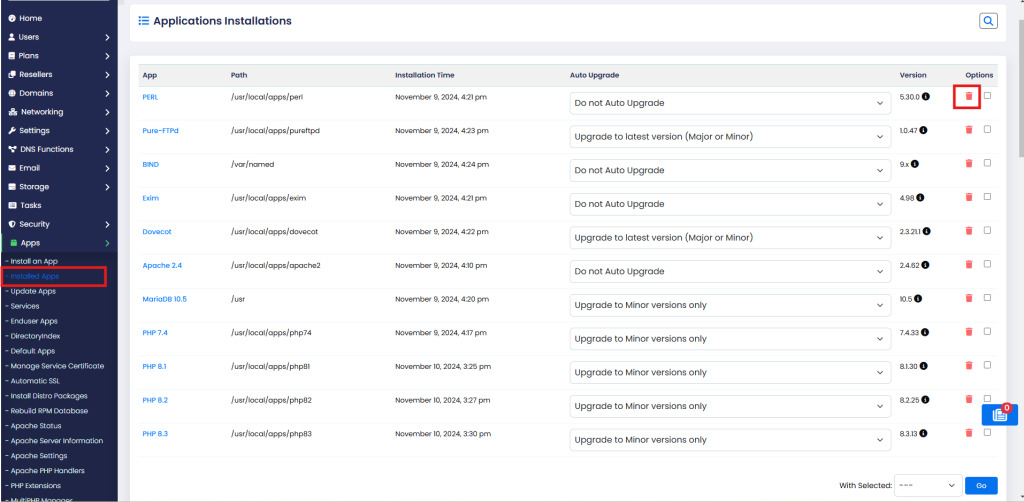
- Go to Apps > Manage Applications in the Webuzo dashboard.
- You’ll see a list of installed applications on your server.
- From this interface, you can:
- Edit Installation Details: Change admin credentials, directory paths, or configuration settings.
- Clone: Create a copy of your application, useful for staging or testing environments.
- Backup and Restore: Generate backups to save your data or restore previous versions if needed.
- Update: Keep your applications up-to-date with the latest features and security patches using the update function.
With these tools, Webuzo makes it easy to keep your applications organized, up-to-date, and secure.
Step 6: Automating Application Backups
Regular backups are essential for website security and reliability. Webuzo allows you to automate backups directly within the App Installer:
- In the Manage Applications section, locate the application you want to back up.
- Select Backup and configure the backup frequency (daily, weekly, monthly) and storage location.
- Click Save to enable automatic backups.
Automated backups offer peace of mind, as they allow you to recover quickly in case of errors, crashes, or data loss.
Step 7: Updating Applications with One Click
Keeping your applications up-to-date is crucial for security and performance. Webuzo’s App Installer includes a one-click update feature:
- Go to Apps > Manage Applications.
- If any updates are available, you’ll see a notification next to the application.
- Click Update to apply the latest version.
Regular updates help prevent vulnerabilities, keep your application running smoothly, and ensure compatibility with plugins and themes.
Step 8: Uninstalling Applications
If you no longer need an application, Webuzo makes it easy to uninstall it and remove all associated files:
- Go to Apps > Manage Applications in Webuzo.
- Find the application you want to uninstall and click Remove.
- Confirm the uninstallation to delete the application and all related files from your server.

This feature helps free up space and keep your server organized, especially if you’re testing multiple applications.
Tips for Managing Applications in Webuzo
- Enable Notifications: Webuzo can send email notifications for updates, backups, or issues with your applications, ensuring you’re always informed about your server’s status.
- Create Staging Environments: Use the cloning feature to create a staging environment where you can safely test updates or modifications before implementing them on your live site.
- Use Strong Passwords: Always create strong, unique passwords for admin accounts to secure your applications against unauthorized access.
Conclusion
With Webuzo’s App Installer, deploying, managing, and updating applications on your server is easier than ever. Whether you’re a beginner launching your first site or an experienced developer managing multiple projects, the one-click installation and comprehensive management tools in Webuzo help you save time, stay secure, and keep everything organized. If you’re looking to streamline your web hosting experience, Webuzo’s App Installer is a powerful tool to have in your toolkit.
Applications with Webuzo Applications with Webuzo Applications with Webuzo Applications with Webuzo Applications with Webuzo Applications with Webuzo Applications with Webuzo


