Webmin is a system administration tool that enables you to manage a web server without the command-line interface (CLI). A popular free cPanel alternative, Webmin can complete a long list of sysadmin features natively and with installable modules:
- File, database, and user management
- Language and theme customization
- Scheduled backup configuration
- Resource monitoring
- Server hardening
- DNS Settings
- Manage email
- And much more…
Table of Contents
Prerequisites
To complete this tutorial, you will need:
- One Ubuntu 22.04 server. This server should have a non-root user with sudo privileges and a UFW firewall configured. Set this up by following our Ubuntu 22.04 initial server setup guide. You can get one from our website.
- Apache installed by following our tutorial on How To Install the Apache Web Server on Ubuntu 22.04. As you follow this prerequisite guide, be sure to configure a virtual host.
- A Fully-Qualified Domain Name (FQDN), with a DNS A record pointing to the IP address of your server. To configure this, follow these instructions on DNS hosting on DigitalOcean.
Check the Hostname
Before you begin installing and configuring the components described in this guide, please make sure you’ve properly completed to setting your hostname. Issue the following commands to make sure it is set properly:
hostname
hostname -f
The first command shows your short hostname, and the second shows your fully qualified domain name (FQDN).
Step 1: Updating the Package Cache
Start by updating the packages in the package manager cache to the latest available versions using the following command:
sudo apt-get update && sudo apt-get upgrade
or
sudo apt update && sudo apt upgrade
Step 2: Adding the Webmin Repository and Installing Webmin
To install the Webmin control panel, you’ll need to add the Webmin repository that will enable you to install the Webmin packages and update them with apt. To make sure this new repository is trusted and that it is indeed the one Webmin developers provide, you’ll download a PGP signature—a digital signature that is used to verify packages that are downloaded from the Internet. Use the following command to get the PGP key provided by the Webmin developers to verify the package’s authenticity, and then use the gpg command line tool to convert it to a file that apt can use:
curl -fsSL https://download.webmin.com/jcameron-key.asc | sudo gpg --dearmor -o /usr/share/keyrings/webmin.gpgHere, you use the wget tool to get Webmin’s PGP key, and then you pass the output to the gpg command line tool to unpack the input and save it to the /usr/share/keyrings/ path. You can now add the Webmin repository with this key. Open the /etc/apt/sources.list file:
sudo nano /etc/apt/sources.listAdd the Webmin repository at the end of the file:
deb [signed-by=/usr/share/keyrings/webmin.gpg] http://download.webmin.com/download/repository sarge contribExit the file with CTRL+X, then press Y and ENTER to save the changes. Update your package index with the newly added Webmin repository:
sudo apt updateOnce the update finishes, you can install Webmin using the following command:
sudo apt install webminOnce the installation finishes, check that the webmin service is running properly using the following command:
sudo systemctl status webminYou should receive an output similar to the following:
Output
. . .
Webmin install complete. You can now login to
https://your_server:10000 as root with your
root password, or as any user who can use sudo.
Note: Webmin is accessible via TCP port 10000. If you have a firewall enabled on your system, you need to allow Webmin’s port through the firewall, so that it can be accessed remotely:
sudo ufw allow 10000Warning: You should be extremely careful with your security practices. It is best to allow only a few trusted IP addresses or IP ranges to access your Webmin control panel. Additionally, make sure to always assign strong passwords for your Unix users, and restrict their permissions. Webmin is a powerful tool, and anyone who gains access to it will have total control over your system. With the Webmin package installed, use your browser to visit the following URL, replacing your_ip_address_or_domain with your server’s IP address or domain name:
https://your_ip_address_or_domain:10000Step 3: Access to Webmin
After you have completed the installation, you can access Webmin from a web browser at https://hostname:10000 or https://ip_address:10000. If you are accessing Webmin from the same machine where you have installed it, you can use localhost as the address in your browser.
If you haven’t set up an SSL certificate from a Certificate Authority like Let’s Encrypt, you will receive a “Not Secure” or “Connection is not private” error depending on your browser. This informs you that the connection to your server is not secure. This error message is normal because Webmin is encrypted and secured with a self-signed certificate, and the browser does not recognize it since your server is not one of its known certificate authorities. Click the Advanced button or More information depending on the browser, and choose to proceed. The following is an example of the error in the Google Chrome browser:


Step 4: Log in to Webmin
Once you proceed, you’ll receive a login page similar to the following: To log in to Webmin, use the same credentials you use to log in to your Ubuntu system (SSH).

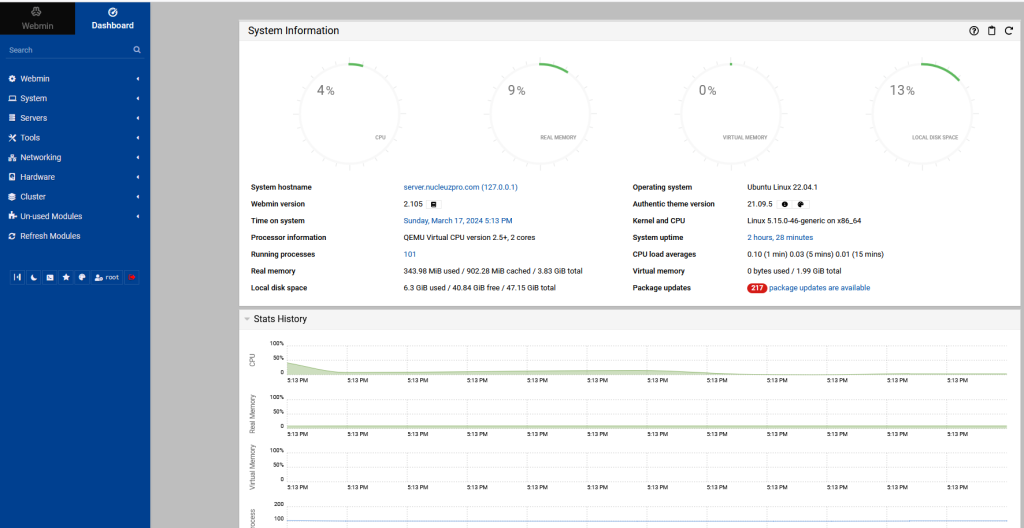
You’ll be taken to the Webmin dashboard, which looks like so:

In this dashboard, you have system information, such as CPU, memory, and disk usage. Additionally, you have a menu with a list of options on the left side of the screen, which you can use to control your system’s functionalities, such as system tools, networking, hardware, etc.
Conclusion
Now you know how to install Webmin on Ubuntu 22.04 After following this tutorial, you should have a fully functioning copy of Webmin set up and ready to use.


